In this first installment in her series on Ecological Cooking, Dancing Rabbit member Sam offers information and tips on heating in a haybox.
At Dancing Rabbit, we eat food, and like most of you reading this, a lot of the food we eat is cooked. While Dancing Rabbit gets a lot of attention for being a sort of laboratory of natural and green building techniques, not everyone here is a builder; but experiments with low-impact cooking techniques are accessible to just about everyone.
In this series we’ll look at some of the ways folks get more cooking from a small amount of energy input, and choose energy sources that pollute less and leave ecosystems more intact. We’ll look at hotboxes, pressure cookers, solar ovens, parabolic ranges, dehydrators, electric appliances, rocket stoves, space heating wood stoves, and more. In each post we’ll share successful examples of one of these, along with some less successful experiments, and give step-by-step advice on using, and buying or building, something like it yourself.
Let’s start with the one cooking tool that is quintessential Dancing Rabbit. Almost every kitchen here has one, but they’re pretty uncommon in mainstream USA. It’s so easy to use that in some ways it makes cooking even easier, while saving large amounts of cooking fuel and keeping the kitchen cooler in the summer. Can you guess what it is? It’s a hay box!
So what is a hay box? It’s really nothing more than a cooler full of old blankets. Any kind of insulated container big enough for a pot with a lid (like a cooler) and something insulating to pack around the pot (like blankets) will do. The very simple idea is that food will keep cooking as long as it stays hot, and there is more than one way to keep it hot long enough to cook completely.
Step by Step: How to Make a Hay Box and Use It to Cook Brown Rice
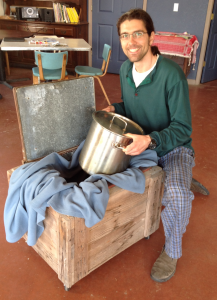
1) The Box: Start with an insulated container. A 50qt cooler is probably good for a single household.
2) The Hay: Get packable insulative material (like blankets or towels) enough to fill the box with your lidded pot inside.
3) The Heat: Half a day before you want to serve your rice, start it boiling like you normally would, with a little less water. 2 cups of rice can cook in 3 1/2 cups of water, for example.
4) The Bundling: With the lid on, nestle your newly boiled pot of rice in the hay box so it’s packed in snugly with blankets all around.
5) The Wait: Restrain yourself from checking on the rice, you’ll just let the heat out. After 6 hours or so, you can check on it. If it needs more cooking, put it back on the stove, and if it’s a while until you’re ready to serve you can wrap it back up in the box to stay warm.
6) The Next Level: Observe how well your hay box performed, and try something new next time. Lentils make a great second dish for a new hay box user, and they go well with rice, now that you’re a master at that!
Take brown rice, for example: Without a hay box, you bring the covered water and rice to a boil and then turn your heat source down and leave the pot on the stove for 20-30 minutes. All that time, you’re turning some kind of fuel into heat to make up for the heat the pot of rice is releasing into your kitchen. That could be fine if you want to heat your home and don’t mind using your cooking fuel to do it. But in the event that your cooking fuel doesn’t have a net positive impact on the planet, or your house doesn’t need heating, a hay box makes a good alternative.
To use a hay box to cook the rice in our example, you’d just bring the covered rice and water to a boil on the stove, then pack the whole pot into the box, with your insulating material stuffed all around. It’ll take a little longer to finish cooking than if you’d left it on the stove, but on the upside, you can’t possibly burn anything in a hay box, and it’ll stay warm for a while with no additional effort. If you want rice for dinner at 6:30, you can put it in the hay box in the morning and it’ll be good to go when you need it.
Lentils and split peas cook like rice but other beans need to be boiled for a couple of minutes at least and then hay boxed all day. With beans you should leave some time between opening the box and needing them for your meal, since sometimes they will need extra cooking at the end. Beans do best in the hay box if they’ve been brought up to pressure in a pressure cooker before going into the box, cooker and all.
Many things that you’d cook in a slow cooker are good in the hay box, too. Soups and stews in particular have plenty of time for melding of flavors without the excessive fuel use and waste heat of simmering on the stove all day. They will not, however, cook down at all, so some recipes won’t work.
Hay boxes are so ubiquitous at Dancing Rabbit because they’re so effortless and make so much sense. All you need to try it out yourself is a cooler (we get ours used from the flea market) and some blankets you can probably find at a thrift store or in your own closet. If you start with rice or millet or even quinoa or oats, you’ll have success to build from and then can move on to more complex and longer-cooking foods. You have very little to lose and lots to gain, just by trying it once.